Showing posts with label Scraplift. Show all posts

Sunday, October 3, 2010

LOAD #3

I went classic style for today's Layout a Day!  The challenge was to focus on photography and create a layout with a photo that tells the story...no journaling!  As I'm in a bit of a journaling mood, this was actually a real challenge.  Yet, once I remembered this photo...I've been wanting to scrapbook it since 2008...it was easy.  The photo and the title say it all!  I'm a little bummed that the weather is so crappy today, because this layout (including the photo) are much more vibrant in real life.  My picture doesn't do it justice.  This layout was inspired by a layout in the Summer 2009 Idea Book.  I used Daydream Level 2, Blush ink, Fresh Shapes DE, Booksmart DE, Clear & Bitty Sparkles.

This is a little note to myself to remind me that I don't have to complete all of Lain's daily challenges for LOAD 2010.  I had a great time doing it this weekend, but my time is at a premium during the week, so that's when I'll go back to completing some of my partially created layouts.  I have so many that I want to finish, so that is my personal challenge this month.  Anything extra is simply a bonus.

Read more...

Wednesday, September 29, 2010

1st Order as a Studio J Member!

I'm so excited about my Studio J Membership!  I just ordered four layouts (8 pages total) for 1/2 off with FREE shipping, FREE page protectors, and FREE JPG files for the web and for printing.  Studio J membership seriously rocks!

Although one of the main goals of Studio J is to do layouts quickly, I actually spent a lot of time on these two layouts about Kit.  After losing her a week ago, I needed to scrapbook her stories to process my grief.  I wanted to take the time to make sure these layouts honored her and expressed my love for her.  I think they are pretty amazing...just like my sweet Kit!


I also took a bit of time with this layout earlier in the summer, because I was trying to figure out how to make my own B&T paper with text.  This is a direct scraplift from the Studio J website!  I posted a screen shot of it earlier, but now you can see the details.


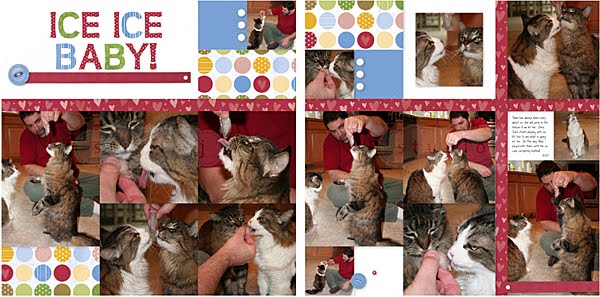
Now, this layout is what Studio J is all about!  I modified my old, out of focus photos in Studio J.  I used the embellishments that came preloaded on the page and simply added a few My Stickease as a title and to cover up a Diet Pepsi can...LOL!  This layout took me less than 1/2 hour and most of that time was spent editing my photos.


If you want some of this scrappy goodness for yourself, let me know and I'll hook you up with a Studio J membership!  I'm going to demonstrate it at the THS FBLA Scrapbooking Crop on October 23rd; I can't wait to share Studio J with everyone I know!

Read more...

Sunday, June 6, 2010

More Studio J Layouts

I completed another batch of Studio J layouts and they are waiting to be filed away into albums. I love how quick and easy each layout comes together. The quality of the photos I used on the "Love Story" layout were really bad--complete user error--but the layout still looks great. I did journal about the fact that the photos are blurry so that anyone looking at the layout will know that they were used intentionally. My favorite LO is "Enjoy" which is a CTMH scraplift!


Read more...

Tuesday, February 16, 2010

A couple more You Rock layouts!

Here are a couple of the layouts I worked on last night while scrapbooking with my friends. I have more details about the layouts on my Close To My Heart Art page.


This layout was created using the artwork on the back of the You Rock My Stickease...did you know there were pictures on the back of the Stickease?! Check it out, because this LO was fast, easy, and oh so cute!

Read more...

Friday, January 1, 2010

New Paper--You Rock!

I absolutely love the new paper kit, You Rock! The colors and design are fantastic. This is my version of the You Rock Workshop on the Go. This awesome LO took less than 1 1/2 sheets of B&T, so I still have a ton of paper, cardstock and embellishments to play with this weekend!

This paper is perfect for this LO about my niece, Kate. We took these photos in Seattle and at my house in 2006. Today she is gearing up to go to New York for a job interview! I’m so proud of and excited for her! I used this LO to write a letter to her. In addition to the Just Be You exclusive stamp set that comes with the Basic WOTG kit (G1006), I used Comments (D1359) for the journaling lines. Comments is a must have stamp set!

Unfortunately, this photo is a bit blurry, but I'm sure you get the idea. For my LO, I used the "Best" option and added the Rockin' Top Coats™ (Z1272) and White Hemp (Z281). I forgot to order the Bitty Sparkles (Z1263), so I'll just add them later for a little bling on the page!

The Rockin' Top Coats™ (Z1272) include 14 fun and funky, colorful overlays! They do have a plastic film covering the top so the image doesn't get scratched. Be sure to take the film off before using the Top Coats™.

Okay, I'm off to make another LO with this kit, because You Rock rocks!

Read more...

Monday, August 10, 2009

Wolf Haven

Our second day trip with Kyle was a quick visit to Wolf Haven. We arrived a few minutes prior to the tour, so it was perfect timing. Wolf Haven is a sanctuary for many wolves but only 14 are on the guided tour. We didn’t get to see all of them, but the ones that were out were absolutely beautiful. They gave us a special treat about half way through the tour…wolves started howling on one end of the sanctuary and each of the wolves returned the call. It was breathtaking! According to the Wolf Haven website, “Vocal communication among wolves consists of howls, whines, growls and barks. Although all the functions of howling are not known, scientists think that one of the main reasons wolves howl is to assemble the pack. Another possible function of howling is to claim territory. Some experts think that wolves can identify other wolves through their howls.” I don’t know what they were trying to communicate, but I’m so glad that I witnessed it!


I’m aware that the title “High Adventure” makes no sense for this LO, but I was doing a direct scraplift from page 17 of the Summer 2009 Idea Book, and I couldn’t deviate from the design! LOL! All supplies are CTMH: Back Country kit, pewter brads, Adventure Dimensional Elements, natural hemp, sanding kit, and My Legacy Writers.

Read more...

Mt. Rainier Hike

I thought I was being kind by letting the boys sleep in, but it ended up being a bad move. By the time we got up to the mountain, the parking lot was full. I couldn’t believe how packed it was during the middle of the week; I would hate to see what it is like there on the weekend. Anyway, we ended up parking a couple miles down the road and hiking back up to the visitor station. We only had a couple hours to spend on the mountain since I needed to get home for the mobile vet visit. We ate a quick lunch and then walked the Skyline Trail to Myrtle Falls and down the 4th Crossing Trail right to our car; it was almost like we planned it that way! It was a really easy, relaxing walk. I’m looking forward to going back and trying some of the more challenging trails.


All supplies are CTMH: Bella WOTG sketch, Back Country, Campin' Fever, pewter brads and photo hangers, Adventure Dimensional Elements, natural hemp,sanding kit, and My Legacy Writers.

I absolutely love this Back Country kit! I added Barn Red textured cardstock and I'm now wishing I would have used a different color. I had already sanded it, so I wasn't going to start over. The Bella sketch has the title under the photo, but I placed the title on the photo, so I'm wondering if I need anything under the picture.

Don't get me started about that picture! I used a great grunge mask from the jessicasprague.com Photoshop class. After I uploaded the photo to Wal-Mart, I checked their print preview option and it looked just like it does here. Well, when I picked up my photos yesterday, most of the top and left borders have been cut off. It looks hideous now, so I adhered it with removable adhesive and am going to print it out at Costco this week. Ugh!

Read more...

Sunday, July 26, 2009

On the Trail at Multnomah Falls


To celebrate his 2nd week of vacation, Neal and I took a day trip to Multnomah Falls on Monday. Our other option was going to the ocean, but we decided it would be more fun if we could spend the night, so we did something a little closer to home. I don’t think either of us planned on hiking as much as we did, because we did not come prepared with good hiking shoes and were wearing jeans. It was incredibly hot, and I was longing for some khakis! Luckily, we ate lunch at the Lodge before heading up so the lack of trail food wasn’t that bad, but the lack of water about killed us! We probably should have turned around once we got to the top of the waterfall, but we pressed on. It was so beautiful and the next mile was so peaceful since very few people went off the beaten path. As rugged as some of the non-paved trail was, it was absolutely worth it to truly enjoy nature alone with my husband! A little over two miles up the mountain, we ran into a work party repairing part of the path that had been washed away. They would have let us by, but Neal and I are both glad that we turned around. We were both feeling dehydrated and needed to get some water. Unfortunately, Neal was far worse off than I was and developed an incredible headache on the way home. I slept most of the way home, so I felt fine! What surprised me about the trip down the mountain was that it hurt more than going up; my feet were killing me! Neal had me tighten my shoelaces and that made a big difference. Honestly, my feet were the only things that hurt on the trip. My legs weren’t sore at all during the hike or the next day. Yet, my hips were so sore the next day; I couldn’t believe it! I’m only 42 and they made me feel like I was 80…this is not a good sign for my old age.

This LO is a direct scraplift from page 19 of the Summer 2009 Idea Book. I absolutely love this Back Country paper packet and need to find my other outdoor/camping photos to finish off the packet. It’s hard to see, but I added grunge masks on the 5x7 photos and an overlay on one with text that reads, Multnomah Falls. I’m practicing my Photoshop skills!

Read more...

Saturday, July 18, 2009

Weekend Challenge = 2 Down + a Sketch

I completed a double-page spread from this Inspired Blueprints sketch. I spent a lot longer on it than planned, but I really like how it turned out. I don't have a great eye for random brad placement, but I like how it looks on other layouts, so I'll keep practicing.


All CTMH supplies unless noted:
Cardstock: White Daisy
Textured CS: White Daisy & Dutch Blue
B&T: Tinkerin’ (green) & Laid Back (blue)
Ink: StazOn Black, Clover Meadow, Dutch Blue, Sunny Yellow, Hydrangea
Stickers: Color Ready Alpha (Oxford Caps & Bold)
Stamps: Spot On Backgrounds (D1280), Star Struck (D1237), Circle Around (D1300), Comments (D1359), Connections (D1330), Good Times (B1332)
Pen: My Legacy Writers
Brads: Summer Carnival, Bigger White & Dutch Blue
Other: Coluzzle circle & Fiskars Threading Water punch

Read more...

Friday, May 8, 2009

LOAD #8

I had a little more time to work on my LO today since I stayed home from school so the mobile vet could come over. I used the Reflections book to find a sketch and continued to use up my Unforgettable kit...I still have a lot left!

I'm going to the school play tonight and need to leave in a few minutes, so I don't have time to write a full review of the Star Trek. Let's just say I loved it! I can't wait to see it in IMAX this weekend.

Here's a photo of my poor baby getting shaved. I'll post the "after" shots tomorrow...she looks so funny!

Read more...

Thursday, May 7, 2009

LOAD #7

I'm back to 12x12 today. The prompt challenged me to use ribbon, and I really did intend on using more when I started this LO, but I'm anxious to go to Star Trek tonight and wanted to get it done ASAP! With that said, I'm heading out to the movie right now!

Read more...

Monday, April 13, 2009

Finally Picked Up PageMaps!

I went to JoAnn's today with a 40% off coupon and walked out with my own copy of PageMaps...finally! I've been wanting this book for ages, so it was a nice surprise to get it at a discount.

Okay, I sense my secondary challenge morphing into using the rest of my Unforgettable paper with sketches from PageMaps!

Read more...

Saturday, April 11, 2009

Why I Love Finishing Files!

So, I posted a couple layouts yesterday and realized it was silly to have them in two places, so I'm going to post the complete layout here and link back to my CTMH gallery for the detail shots. That seems to make more sense. This layout uses the Unforgettable paper pack and is a direct scraplift from page 21 of the Spring 2009 Idea Book. I love how quickly the layouts come together using Cherish and scraplifting the embellishments!


So, while I was working on this LO, I was reminded about how much I love our finishing files! When I work with Dimensional Elements, I usually ink them with a sponge dauber or use the back of a large stamp. I like to add stamped images to the top to add even more dimension. I find that this is the quickest way to work with DE. Yet, there are times when I really want to take it to the next level and I cover the DE with B&T or preprinted patterns. The finishing files make a huge difference when covering them with B&T! Here are some photos from the layout above.


The first step is to glue the top of the DE to the back of the B&T. I use a strong adhesive like CTMH Bonding Memories or Aleene's Tacky Glue. Anything that will glue the edges. Regular tape runner adhesive is not good for this. I let it dry over night to be on the safe side.

When you cut out the pieces, don't worry about getting too close to the edge...that's where the finishing files come into play! Simply run the finishing files along the edges of each DE and the paper will come off. The files have different shapes to allow you to get into tight spots. I use the flat and rounded edge of the largest file the most.

When you are done, this is what they look like. Now you can embellish to your hearts content. I inked the edges for my final layout, but sometimes I like to leave the white edge of the paper and DE showing through. The DE are easy to poke holes in for placing brads or setting eyelets. I also like to add a bit of bling to my DE using buttons, sparkles, Liquid Glass, and glitter.

Read more...

About This Blog

For the past few years, I have been striving to add more creativity to my life through scrapbooking, acting, web design, and writing. This blog allows me to document my ongoing journey. I'm also a Close To My Heart consultant, so I will share specials and post new product ideas. Watch out for a contest or two, as well!

  © Free Blogger Templates Spain by Ourblogtemplates.com 2008

Back to TOP